After you have finished downloading the file(s) you are ready to start the Server installation.
Click on the link from your Download screen (or on the file itself from your Downloads folder).
When you install the server on of the options ask if you also want to install the workstation at the same time. This way you do not have to separately install the workstation on the server.
You will see the usual Windows prompt for an executable file. Click on Run.
You will then come to the Install Wizard that first asks where to install Spire. – press Next to continue.

The next step asks if you want to have Spire manage the PostgreSQL database engine. It is recommended that you do this unless PostgreSQL has been installed by another application besides Spire. Note that if you do choose not to let Spire install PostgeSQL it may not get configured optimally for Spire.

Next the install asks where to install the PostgreSQL database. Choose the fastest drive possible that has enough space on it.
You are also asked if the user accounts should be restored. This option should be selected if a previous version of Spire version 3 and above is being restored to a new server. Spire stores the users in a database that is not backed up with the company data, so therefore Spire automatically backs up the users on a daily basis. Note that only the basic information about the user is stored in the user database, and all options and security is stored and backed up in the company data.
The user backup file is called spire with a date/time appended to it. ie- spire_2018-08-31.backup

Next you will be asked to create a password for access to the database through tools like PGAdmin. This is not the same as the ‘Spire Admin Account’

You will need to define the Port that will be used by the application. By default, it is set to 10880. If this is a new installation of Spire, and you aren’t upgrading from BV/BVE, then leave it set to the default. However if you are upgrading, and Essentials exists on this server, then it may be using Port 10880 already by default.
You will need to change one or the other to prevent a conflict. We recommend you let Spire keep 10880 and set Essentials to something else like 10888.

The next window discusses Firewall Exceptions – it is recommended you leave this set to the default of Add Exceptions.

The next window asks permission to turn on data collection. This allows and errors to be sent to Spire without the users intervention. It is highly recommended to turn this on as it helps us with program development. No propitiatory information is sent.

The next one is the name of the shortcut.

The next window is only presented if you opted to install Spire workstation at the same time as the server.
See Installing Spire on a Workstation
The next step is to create a Spire Administrator Account.This user is required to create and manage Spire user accounts, and it used to access the Spire Tray. Other Admin users can be created at a later date.
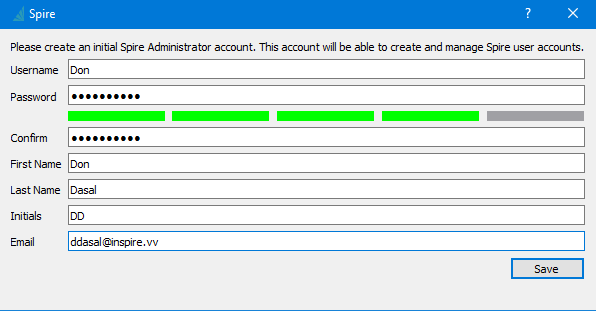
The password must be at least a level 2 complexity.
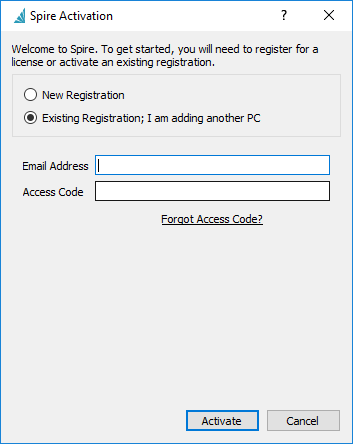
After saving the admin user setup you will need to register Spire if it has not already been register with a previous version on this server. You can choose to do a new registration, or an existing one if Spire has been registered for this company, but has never been installed on this server,
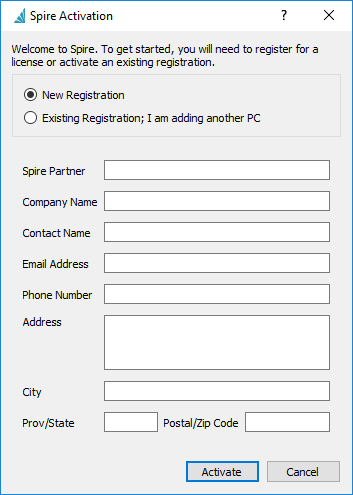
If selecting existing registration you will need to know the email address the registration was done with and the access code. This can be obtained from your Spire partner if you have not kept record of it, or select “Forgot Access Code” as long as you know the email address of the registrant, and have access to the recovery email.