The Inventory Count procedure is used to aid in reconciling actual inventory quantities to those stored in the data, for individual or groups of inventory items. Counting inventory is an important part of keeping your system up to date and accurate with regard to quantities. Properly and regularly counting inventory helps keep costing, purchasing and materials forecasting accurate. Spire helps make this process efficient by allowing counts to be performed with a bar-code reader, or via entering counts manually. You can combine these methods, and Spire keeps track of count transactions, per item, as they are entered. These transactions display values such as count quantity, the user who created the item count record and the date they entered the count quantity. Spire supports counting in different units of measure, handles average costing and FIFO costing and posts adjusting General Ledger Journal Entries as necessary.
Before counting inventory please note that it is critical that physical inventory quantities remain static (i.e. actual quantities of items on shelves and in bins). While you may continue to received purchase orders and invoice sales orders it is important that, at the point you “freeze inventory” that the physical inventory state matches the systems expected state of inventory. The result of an inventory count in Spire is to capture difference between the expected state of inventory and actual state of inventory. If inventory is physically removed AFTER a count process is started but BEFORE the item is counted, inaccuracies will result. Based on this, inventory counts should be accomplished as quickly as possible. It is also important that no serial numbers or lot numbers are assigned to unposted orders and unposted inventory adjustments and transfers when performing the inventory count.
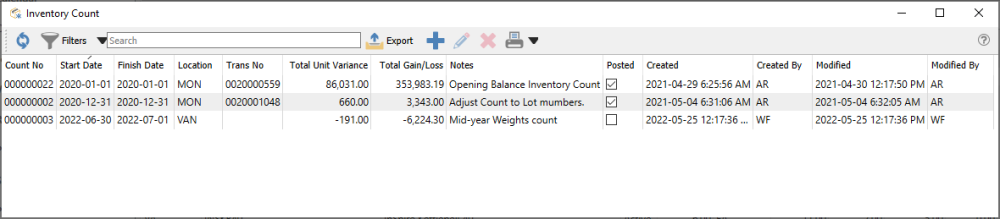
Inventory Counts can be initiated from two different places in Spire. One place is from the top Inventory menu and the Inventory Counts selection. This opens the Count list window, and a new group of item Counts can be created from here with the Plus button, from which items are selected one at a time or as a group of items.
The other place is from the Inventory list, where one or more items to count are highlighted in the grid, and then the Count button in the toolbar is clicked to start the transaction.
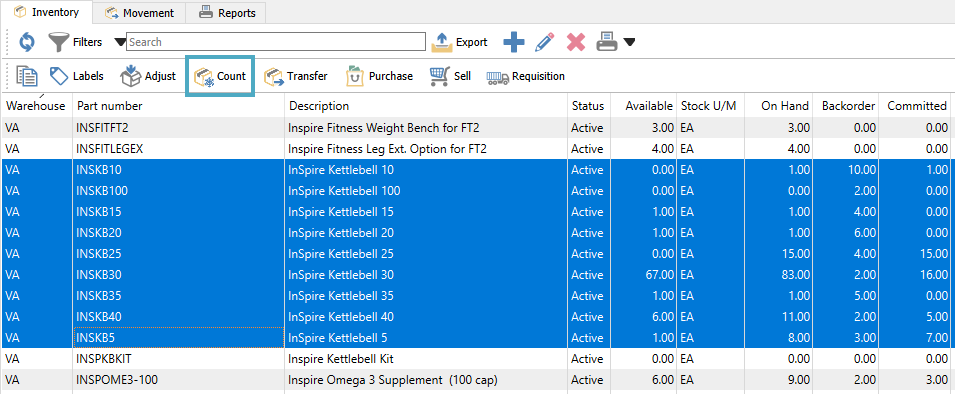
It may be interesting to use filters on the Inventory List to determine a group of items to count, such as those in a particular warehouse location or those that haven’t been counted since a certain date.

Count Header
Save – Saves the count transaction, and reserves the count number from the Next Inventory Count in Company Settings for this transaction, if this count hasn’t yet been saved.
Save Close – Performs all the same processes as indicated for Save above, and the count transaction window is closed.
Save New – Performs all the same processes as indicated for Save Close above, and a new count transaction is started.
Print – Choose to print or email an Inventory Count Sheet report – either grouped by Location or all together – in preparation to perform the count, or the Inventory Count Review report – either for all items or just those with a non-zero Inventory Variance – to verify the counts were entered correctly.
Post / Post and Review GL – Confirm the counted quantity and cost for all items, update the quantity on hand values for items with different counted values, and generate a GL transaction for the updated cost changes. Depending on User security settings, you can choose to see or even change the GL transaction details prior to posting.
Expand All – Expand to show the count entry details including date, time and user for all items. Or Collapse All to show the summary Counted Qty for all items.
Freeze Inventory – This opens an inventory item window and allows you to add groups of items for counting, instead of one at a time. ‘Freezing’ inventory does not prevent any sales, purchase or other transactions from being processed.

Scan Items – When counting items, you can scan a bar code to increment the Counted Qty of the associated item and unit of measure by 1, whether this is for an item already selected to count or for an item not yet added to this list. The quantity multiplier is supported here, if you want to increment the counted quantity by a particular value with a single scan.
Manual Count – This opens a new window where manually counted quantities are entered. Every time you access this screen and save a count, this adds to the overall counted qty for each item, not replacing existing counts. This allows you to do multiple counts in different locations for the same item, prior to posting, perhaps from different users or different areas of a warehouse.
Open Inventory – Opens the highlighted item in a new window to view or edit.
Count Number – A unique count transaction number, assigned from the next number in Company Settings, loaded when you first create the transaction, and reserved when the count is saved.
Location – If you have Locations enabled in Company Settings, and either the Adjustment or Inventory Control account are configured with a Location segment, the posted GL transaction will update the account with the respective location segment. If no location-specific account exists, then the base account will be used in the transaction.
Trans No – The GL transaction identification, populated when the transfer is posted.
Start Date – The date the count was started, only used for reports.
Finish Date – The date the count was finished, only used for reports.
Add – Include another item for entering a count. This is only available for counts not yet posted.
Delete – Remove an item from counting. This is only available for counts not yet posted.
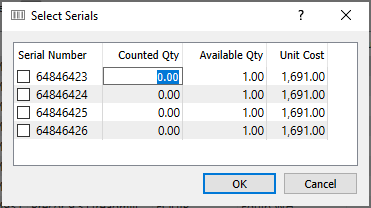
Count Serials – This button is active only when an item that supports either serial numbers or lot numbers is highlighted. For each serial / lot number, the Counted Qty is entered, thereby indicating specific numbers that exist. Enter 1 for counted serial numbers, or the value for counted quantity within each lot number. If the actual count exceeds what was expected, you cannot add new serial numbers from this count process, so an Adjustment transaction would be required to add this.
Count Details
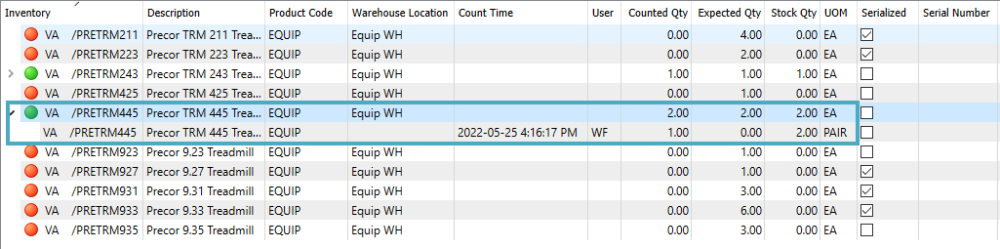
Inventory – Item part number, and warehouse code if used. A coloured indicator displays green if the counted quantity is equal to the expected quantity, orange if a count was entered but different than expected, and red if the counted quantity is zero (and a non-zero quantity is expected).
Description – Description of the part number.
Warehouse Location – The warehouse location description for this item for reference, which is different than the Location in the Header that affects accounting. The Warehouse Location can be edited here, and the new value will update the inventory item value when the count is posted.
Serialized – This indicates if the inventory item type is either Serialized or Lot numbered. Highlighting a serialized item enables the Count Serials button for counting by individual serial number or group lot numbers.
Serial Number – If the Count Serials process was used to count an inventory item that supports Serial or Lot Numbers, the numbers indicated as counted will be displayed here. Note that serial or lot numbers need to have been previously received, as you cannot add new numbers from inventory counts.
Counted Qty – Quantity entered as the count in the assigned unit of measure, which can be more or less than the Expected Qty, including zero.
UOM – Unit of Measure of the counted item, available as a selection from the supported units configured on the inventory item.
Expected Qty – What the stored quantity on hand is for this item, in the stocking unit of measure, at the time the item was added to this count. Subsequent transactions posted afterwards will not update this value. This column is visible only if the User Setting to View Count Variance is enabled.
Stock Qty – The Counted Qty displayed based in the Stocking unit of measure, calculated from the selected unit conversion factor.
Cost – The Average unit cost of the item at the time this item was added to the count. This amount cannot be edited, and will be used to calculate the gain/loss amount for items that have a counted quantity variance.
Unit Variance – The calculated difference between the Counted (Stock) and Expected quantities. A negative Unit Variance means that there are fewer counted items than were expected. This column is visible only if the User Setting to View Count Variance is enabled.
Gain/Loss – The amount change for the cost of inventory, calculated from the unit cost and the unit variance. A negative Gain/Loss means that there are fewer counted items than were expected, and thus the cost of inventory will decrease. This column is visible only if the User Setting to View Count Variance is enabled.
Notes – Free text that can be assigned to any counted item, perhaps to indicate a reason for a counted quantity variance.
Count Time – The date and time that the Counted Qty for this item was entered. This is only visible on the Expanded count lines.
User – The user initials that entered the count for this item. This is only visible on the Expanded count lines.
Count Footer
Notes – A larger volume of text that can be added for this count transaction as a whole, which is also displayed on the Inventory Count list and prints on reports.
Total Unit Variance – Total sum of all quantity on hand changes for the count transaction. A net negative change in units will display in red font.
Total Gain/Loss – Total sum of all extended cost changes for the count transaction. A net negative change in cost will display in red font.
Manual Count and Entry
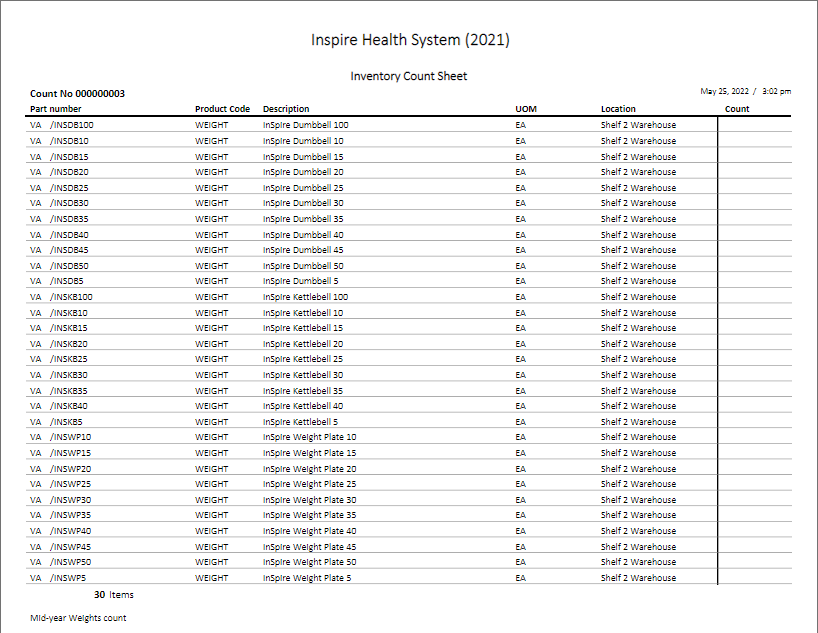
After all the desired items to count have been added to the list, you can then perform and enter the counted quantities. If you are entering the counts manually, you may want to print the
Inventory Count Sheet (by Location) report in order to have all selected items on paper, where counts can be written.
After the count has been performed and the actual quantities for this items known, they are recorded here by clicking the Manual Count button and entering the quantities in the new window.
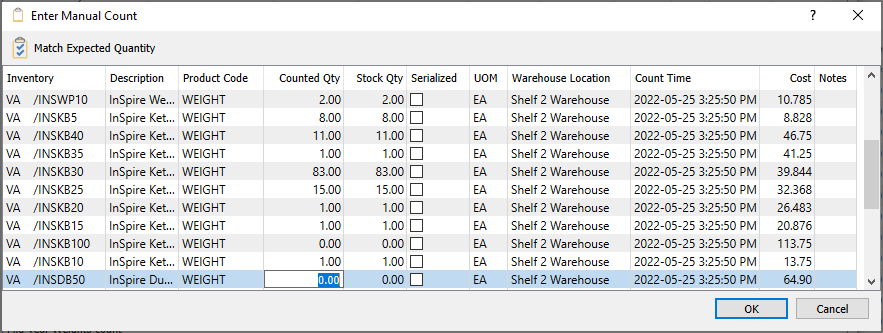
Simply click in the Counted Qty cell for an item to edit the value to the actual quantity counted. It is possible to use the Match Expected Quantity button to pre-fill all the Counted Qty values with the respected Expected quantities, and just modify those that didn’t match, if the User Setting to View Count Variance is enabled. You can also change the Warehouse Location here, and write back to the item when posting the count, or add a Note to indicate a reason why the count differed or any other desired text. When all the counts and notes have been entered, click the OK button to save the changes.

After an item count, it is easy to see where differences are, as either green, red or orange indicators will be next to each item number. Green indicators show counts that match expected, and red and orange indicators show non-matching counts. To see the count detail, expand any item by clicking the arrowhead to the left, or all items by clicking the Expand All toolbar button. These expanded lines show details of the Counted Qty, Count Time details, and User, which could have multiple lines if multiple counts were saved, and the Counted Qty, unit of measure or Warehouse Location can be modified if a correction from the saved count is necessary.
Once all editing has been done, you can print an Inventory Count Review report to list all the items and their respective counts, where those with a variance will stand out with difference values to the right. The Inventory Variance report is similar to the Inventory Count report, except that only those items with a variance are printed. These reports can be printed as often as required throughout the course of an inventory count.

When you are ready to commit the counts to the company data, click the Post button in the toolbar. A screen will appear to enter the transaction date that will be used for the item adjustments and GL journal entry. You may be able to see or even change the GL accounts if a User Setting is enabled to allow this. Any inventory count adjustment transactions will be saved with the items, and a journal entry will be posted to the General Ledger, updating the Inventory control and Inventory Adjustment accounts, with the Location segment included when applicable.

A Post Inventory Count report is also available to list just the items that had a quantity variance, along with costs.

The posted count can be viewed at any time from the inventory count list or from the General Ledger journal entry and the View Source button. Any inventory count adjustments can also be seen from the Movement or Receipts tabs while editing an item, with a transaction Source equal to Count.
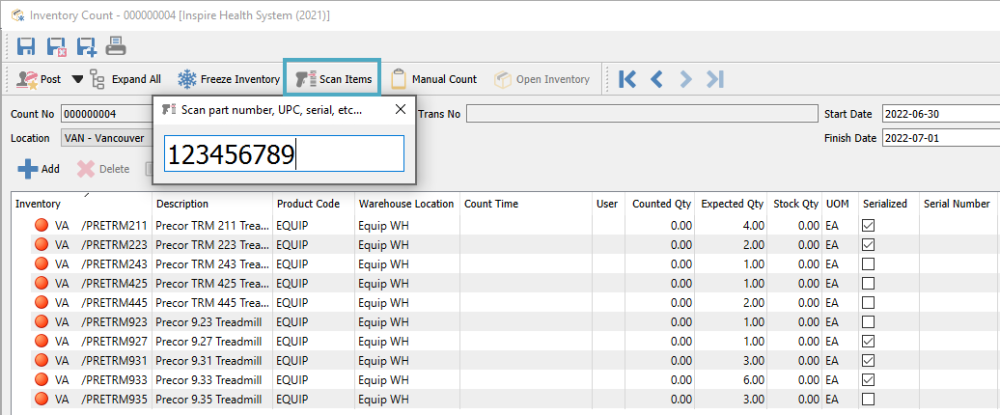
Scanning Items
Scanning barcodes for counting items tends to be more efficient than counting them manually, especially in larger count volumes, to assist in ensuring that the correct counted item is updatted. To perform counts by scanning barcodes, click the Scan Items button to open the scan window and then scan the barcode.
If the code was located, it will automatically increment the count of that item by one, or by the quantity multiplier if this was included with the scan.
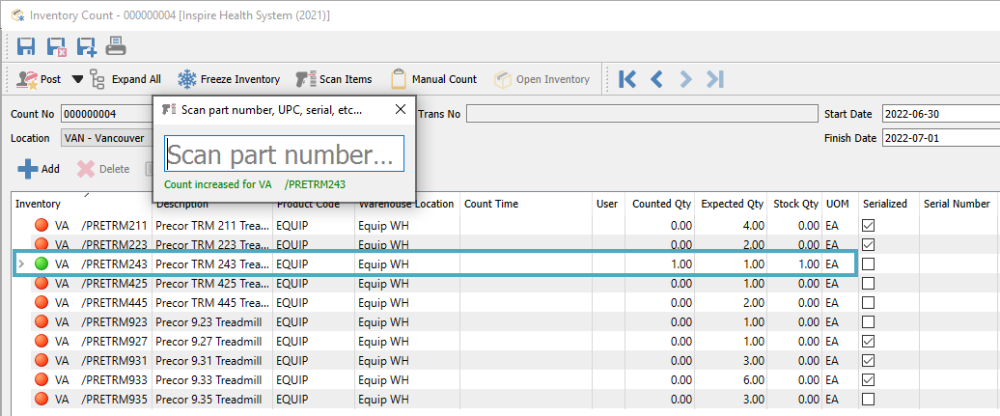
If the barcode you scanned was for a unit of measure other than the stocking unit, that will be recognized and used for the count. The Stock Qty will be calculated in the stocking unit.
Serial or Lot Numbers
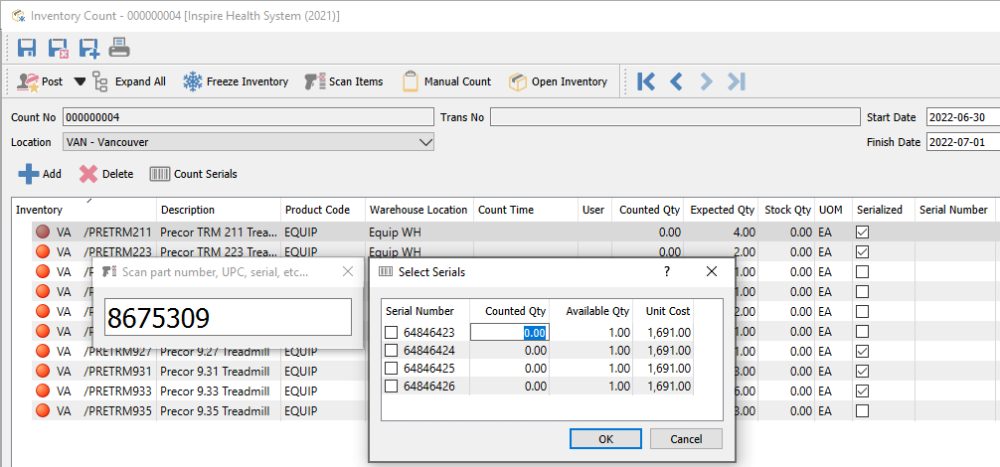
If the item that you are counting supports either serial numbers or lot numbers, you can manually select all of those counted, either by using the checkbox or entering the quantity.
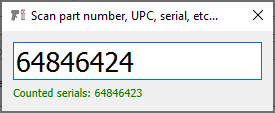
If the item also has UPC barcodes entered, you can scan this to bring up the serial number selection screen for the one you scanned.
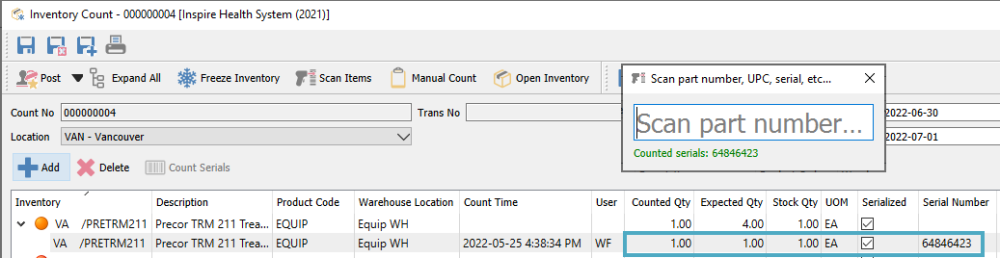
If there is a barcode associated with the serial or lot number, you can scan this to immediately increment the count for that number.