
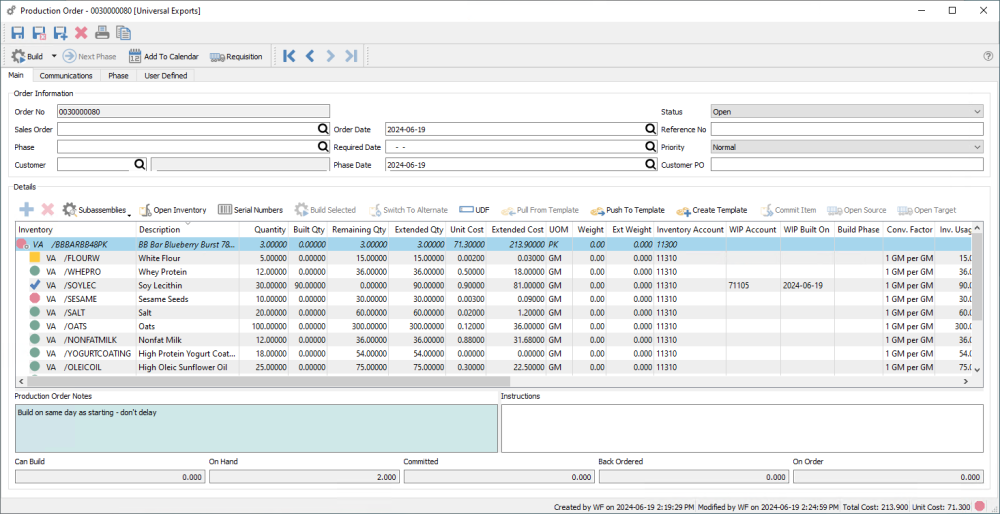
Once a production order has been created it can go through several steps before it gets built and received to inventory. Click on the add or edit icon to open a production order.
Header Toolbar
Save – Saves the production order and leaves the window open.
Save/Close – Saves the production order and closes the window.
Save/Create New – Saves the production order and immediately opens a new production order window.
Delete – Deletes the production order. Any Committed component item quantities will be restored to Available.
Print – Opens the report window to print either the Production Order or a Trial Build report.
Copy – Create a new Open production order based on the information from this order.
Navigation – Closes the current production order and opens either the first, previous, next or last order on the grid, depending on how the list is sorted.
Build – Completes the Production order to receive the finished product using the total component cost, and relieves the component quantities from inventory.
Build Phase – An optional procedure to immediately consume all components and subassemblies that have a Build Phase value equal to the order Phase. Ledger transactions are created to a work in process clearing account, and the order phase is incremented if a Next Phase exists.
Requisition – When not enough component items are in stock to fulfill this Production order, you can create a requisition for a purchase order to buy that stock.
Next Phase – Moves the production order to the next phase, if the Phase field is not empty and User Security allows, based on the custom phase sequence set up for production.
Add To Calendar – Attach a communication note to the Production Order and assign a due date, user and attachments. Read the Calendar manual topic for more information.
Main Tab
Order No – The transaction number assigned to this production order, assigned from the next number in Company Setting/Sequence/Production when created.
Sales Order – The sales order number that this production order was requisitioned from to fulfill a backorder. This can be manually selected or populated from the sales order requisition.
Phase – If you use phases, you can manually assign this production order status or increment it to the next phase in the sequence from the toolbar button. It can also be assigned from a User Setting for a default phase value, or from a production Template.
Customer – The customer that this production order is for. It is populated from sales orders when a user requisitions a manufactured item, or set from a production template, and can be edited manually.
Order Date – The date that this production order was created. It can be edited if necessary.
Required Date – The date that this production order needs to be completed by. This date is populated from the required date of a source sales order requisition, otherwise it is blank by default and can be edited manually.
Phase Date – The date that this production order was assigned the current phase. Phase dates for all phases this order has gone through can be seen from the Phase tab.
Status – Production orders can have one of the following three statuses:
- Open – This means the components of this production order are not yet committed in inventory.
- Pending – The components are now committed but you want to indicate that the production has not yet started.
- In Progress – The components are committed and the work has also started. When a component is built with Work in Process, the status is automatically changed to In Progress.
Choosing either the Pending or In Progress status will mark production components as committed, and set inventory item quantity as Committed, if the User Setting to Automatically Commit is enabled.
Reference No – An alphanumeric value you can use for any identification or selection / sorting purpose.
Priority – Choose from one of 5 values, from Highest to Lowest, so that you could sort or filter the list to see the most important ones.
Customer PO – The customers purchase order number from the assigned sales order, selected either through a requisition or when chosen manually.
Detail Toolbar
Add – Inserts a component or sub-assembly line above the highlighted item. You can also add a new item to the end of the list by clicking the cell below the last item.
Delete – Deletes the highlighted component or sub-assembly line.
Sub Assemblies – When subassemblies are Expanded to show their components, building the production order will consume the components of the subassemblies. You can choose either Expand All for all subassemblies, or Expand Unavailable to display sub-components for only those subassemblies that do not have enough quantity on hand to fulfill the order. Collapse All will suppress subassembly components and use subassembly items on hand, ignoring the component quantities. Using the arrowhead to the left of an expanded subassembly to show/hide components is for display only and has no other effect on processing.
Open Inventory – Opens the inventory record for the highlight production order detail to view or edit, to be able to see historical or other required information.
Serial Numbers – When component items support serial or lot numbers, select which numbers are used for the consumed quantity. Lot numbers are automatically consumed when a production is built, unless the component uses the Consume by Choice method.
Build Selected – When a component has a WIP Account defined, use this to immediately consume the quantity on hand and marl the line as Work in Process. You do not require a Build Phase to use Build Selected. Work in Process components cannot be edited, deleted or reversed.
Switch to Alternate – If a component item does not have enough quantity on hand for this production order, as indicated by a red or yellow icon, you may wish to use this to switch the item for its defined alternative item number. If the item does not have an alternate part number assigned, this button will not be active.
UDF – Opens a screen to display the user defined fields for the highlighted item, for storing additional information not already defined in the Spire database. This is separate from the User Defined tab, which shows additional fields for the production order rather than an individual detail. (Note- a license for Spire UDF is required)
Pull From Template – If this production order was created from a template, highlight the assembly item at the top to activate this button, as long as no values have been modified on the assembly item. You can re-read the components from the template to update component quantities and costs, in case the template has changed since the order was first created. Any components that have been modified on the order will be skipped when refreshing values from the template.
Push To Template – If this production order was created from a template, highlight the assembly item at the top to activate this button. You can save the current components and their quantities and costs on this production order back to the template to update the new values.
Create Template – When the assembly item or a subassembly item is highlighted, this button will be active to save this and the respective components as a new template. This might be useful when you want to remember values for future use, or save modifications as a separate template.
Commit Item – If the production order status is changed from Open to either Pending or In Progress, and your User Setting for ‘Automatically commit’ is not enabled, you can reserve the selected component quantity in inventory for this order. If the production order has an Open status, this button will not be active. If the User Setting for ‘Automatically commit’ is enabled, then all component items will have quantity immediately committed when the order status is changed, and the Commit Item button has no additional effect.
Open Source – If this production order was created from a sales order requisition, this will open the related sales order in a new window for investigation or editing.
Open Target – If a highlighted component item has been requisitioned to a purchase order, this will open the related purchase order in a new window for investigation or editing.
Details
The Details list has the assembly item in the first row, followed by all the assembly components. Some information can be edited directly in the grid; whenever a modification is made, the row is displayed in italic font, and any procedures that refresh production contents will bypass the row so that changes are not lost.
Inventory – The manufactured item being built is listed at the top, along with the warehouse if applicable, and all components and sub-assemblies are listed beneath it. Clicking in the bottom blank row within this column will add a new component.
Description – The description of the item, which can be edited here.
Quantity – For the manufactured item being produced, the number of units being built on this order is entered on the top row. For the components and sub-assembly items that follow, the values shown are the number of units that will be consumed for each unit of the produced item built. Any quantity value can be edited in the grid.
Built Qty – For the manufactured item being produced, the number of units that have been built so far. For the components and sub-assembly items that follow, the number of units that have been consumed so far.
Remaining Qty – How many manufactured items are still left to build, and how many component and sub-assembly items are still left to consume.
Extended Qty – For the components and sub-assembly items, the values are calculated from the quantity of the manufactured item to be built times the quantity of the respective component or sub-assembly. Any value in this column can be edited.
Committed Qty – This column is visible when the order status is either Pending or In Progress. Values can be edited to reserve component item quantities for this order.
Unit Cost – For the assembly item being produced, the sum of the components extended costs, divided by the total quantity being build, and is for display only. For the components and sub-assembly items that follow, values are determined by a Company Setting for the Cost Method, which could be the Inventory cost, Current cost or Standard cost. Values can also be edited on component lines.
Extended Cost – The calculated total cost for this item on the production order. For component items, this is: (Extended Quantity) x (Unit Cost). For the assembled item or sub-assemblies, this is the total of all the component Extended costs.
UOM – The unit of measure associated with either the manufactured, component and sub-assembly items. This can be edited if alternate units of measure exist for any item.
Conv. Factor – The multiplication factor assigned to the unit of measure of each respective item is displayed.
Inv. Usage – The quantity of the component item being consumed, expressed in the item stocking unit of measure. It is calculated from the Extended Quantity times the unit Conversion Factor. This is not used for the manufactured item.
Lead – The lead time from the supplier, saved as an integer value. This value can be edited in the grid.
Vendor No – The vendor the component is usually purchased from. If this value is blank, Requisitions for the component item will use the Primary Vendor assigned on the inventory record.
Category – An optional field to classify any of the produced or component items, selected from a user-defined list of Bill of Materials Categories. Typically this is used for reporting purposes.
Exp. Yield% – The typical percentage of the manufactured item that is built using the component quantity values. A complete build would have a yield of 100%, and this value can be edited in the grid. If this value is less than 100%, then Extended Qty values for all items are increased it indicate that more components are needed to build the required qty of the manufactured item, calculated by dividing the Quantity by the Yield%. This value is not editable on component item lines.
Exp. Scrap% – The typical waste percentage for this component, which can be read from the template, and can also be modified manually. This is used to calculate the Expected Scrap Quantity.
Exp. Scrap Qty – The typical waste quantity for this component, which can be read from the template and can also be modified manually. This value is added to the Extended Qty used for the component item when building (unless an Actual Scrap Qty exists), which affects the cost of manufacturing and the quantity of this component consumed.
Act. Scrap Qty – The actual scrap quantity for this component. This is usually edited just before building the production order. This value gets added to the Extended Qty used for the component item when building, which affects the cost of manufacturing and the qty of this component consumed.
Assemble Qty – For the manufactured item being produced, the total quantity to build, based on yield.
Assembled Qty – For the manufactured item being produced, the quantity that has been built so far, based on yield.
Date – The date that the item was added to the production order. This value can be edited in the grid.
Employee – The employee code can be added manually to indicate who was responsible, if Payroll is integrated.
Employee Name – The name from the employee record as selected above.
Requisition Type – If this production order was created from a requisition, the item to be built will have ‘Inventory’ if it was requisitioned from the inventory list, or ‘Sales Order’ if the requisition came from a sales order. If component items were requisitioned for purchase, this Type field will have ‘Purchase Order’ on each of these items.
Requisition No – The respective purchase order number or sales order number associated with the requisition type value, for easier tracking. Requisitions initiated from the Inventory list do not have a number here.
Template – The production template number associated with the item on this order. Component items will typically have the same template value as the manufactured item. Sub-assemblies will have a different template number than the main item to build and the regular component items. If a component item template value is blank, the item was added manually to the order and did not originate from the template.
Revision – For the manufactured item being produced, the revision value of the template, which can be set on the template when a change is saved.
Build Phase – For components or subassemblies that will be consumed prior to building the production order, assign the Phase code when this will occur. At the same time, the default WIP account specified in Company Settings will be included. Consumption will occur when the Build Phase procedure is performed and the Order Phase matches this value.
WIP Account – For components or subassemblies that will be consumed prior to building the production order, assign the Ledger clearing account that will be debited for the Work in Process transaction. WIP accounts to not have to be be same for all components.
WIP Built On – When components or subassemblies have been consumed by Work in Process, the system date is saved here.
Inventory Account – Displays the value from the inventory master record and cannot be edited.
Weight – For components, the unit weight from the production template. Newly added components use the unit Weight from the inventory record. The Assembly item has a unit Weight calculated from the components, unless an edited value exists on the template. All values can be modified if necessary.
Extended Weight – A display-only calculation of the unit weight multiplied by the Extended Qty.
Other Tabs
Communications – Any number of communication notes or alerts can be added to an order, to track production alteration notes, customer conversations or anything important to be remembered. Read the Communications manual topic for additional information.
Phase – If production phases are used, whenever the phase value is added or changed, it gets logged on this tab with the start date, time and user. Additional notes can also be entered manually here for each phase change.
User Defined – Additional fields can be added to the production order to track info that Spire does not have by default, if the optional User Defined Fields module is used. Read the User Defined Fields manual topic for additional information.
Reports
When editing a production order, the report button at the top of the window gives you access to this list of reports.
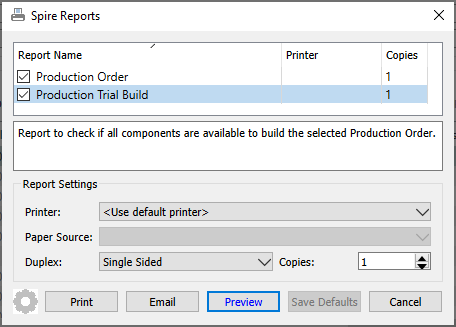
Production Order – Prints the list of component items and their respective quantities and costs, required to build the specified quantity of the Manufactured inventory item.

Production Trial Build – Prints the list of component items and their respective quantities and costs, grouped by whether or not there are enough on hand to complete the build.
