
The Production templates tab is where the components are defined for production orders. They are otherwise known as ‘Bills of Material’ (‘BOMs’) or ‘Recipes’. When a new production order is created, you can select the template from which to derive the order. The production order can then be customized for a particular need. If a template changes then you can choose to update the existing open production orders with the changes.
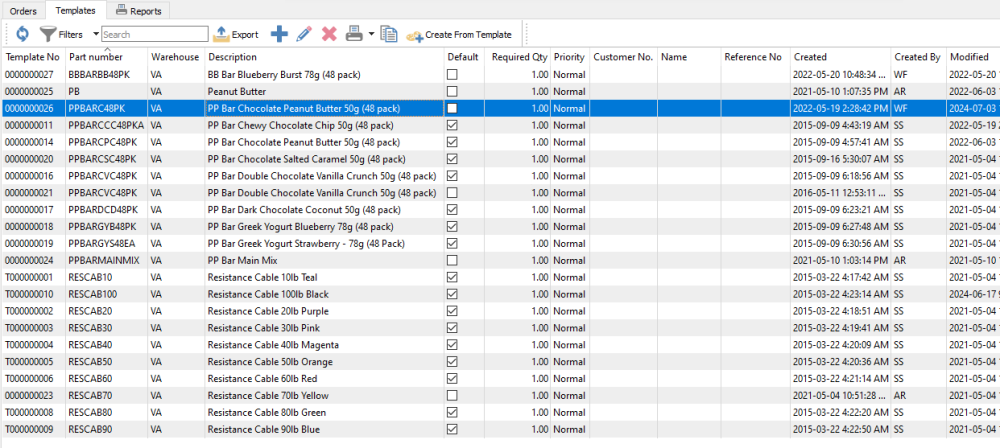
Refresh – Updates the list of templates for changes that others have made.
Filters – Enter selection criteria to limit the list to just the templates required.
Search – Enter word(s) to find info from the header or details of templates. A minimum of 3 characters is required to search, and partial matches can be made with the Template No value.
Export – Exports the list to Excel or .csv. This is typically most valuable when the list is filtered to a meaningful selection.
Add – Create a new template from scratch, using the next template number from Company Settings / Sequence Numbers, if User Settings security allows.
Edit – Open the highlighted template order in the list. if User Settings security allows editing, then values can be changed and saved, otherwise the template is opened in view-only mode.
Delete – Deletes selected template(s).
Print – Prints selected template(s). Reports with ‘Production Template List’ as the Crystal Reports template will be presented for printing.
Copy – Create a new production template based on the highlighted template.
Create From Template – Uses the template configuration to create a new production order.
Update Orders – If any changes are made to the template, this will push those changes to outstanding Production orders. In the case where information on a Production Order was edited from the template default, that information will not be changed when Update Orders is performed, thus your modification will not be lost. Similarly, production details marked as committed because the order or the detail is In Progress, or details with a Work in Process status will not be changed when orders are updated.
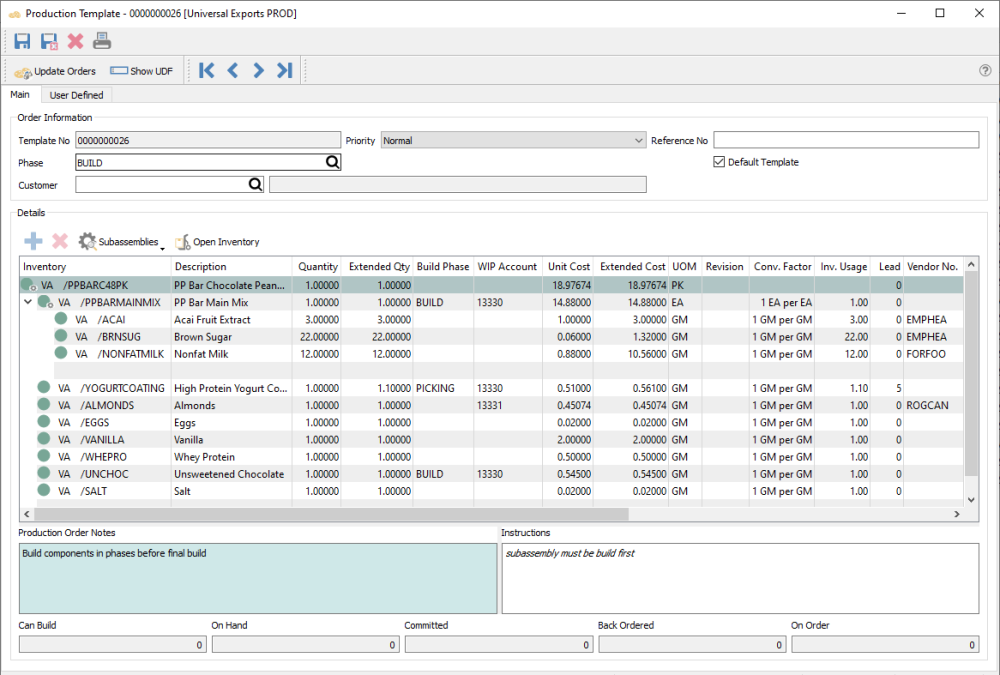
Order Information
The following information can be inserted into new production orders by default. This information will not override the respective fields of an already created production order if this template is used to update or push to those orders.
Template No – The sequence number assigned to the template. New templates has this value populated from the next sequence from Company Settings / Sequence numbers.
Priority – Choose from one of 5 values, from Highest to Lowest, so that you could sort or filter the list to see the most important ones.
Reference No – An alphanumeric value you can use for any identification or selection / sorting purpose.
Default Template – When more than one template has been created for the same part number and warehouse, use this template for new production orders.
Phase – If you want to start a production order at a phase different than the one defaulted in User Settings, select the desired production phase.
Customer No – The customer that this template is usually for. When production orders are created from Requisitions of sales orders, the customer from the sales order will preplace any value entered on the template.
Name – The name of the selected customer.
Detail Toolbar
Add – Inserts a component or sub-assembly line above the highlighted item. You can also add a new item to the end of the list by clicking the cell below the last item.
Delete – Deletes the highlighted component or sub-assembly line.
Subassemblies – Allows showing or suppressing the components of sub-assembly items. This determines whether subassembly or it’s sub-components will be required when building a production – this can be modified when editing a production order.
Open Inventory – The highlighted manufactured or component item will be opened in a new window for investigation or editing.
Detail List
The Details list has the manufactured item in the first row, followed by all the assembly components. Some information can be edited directly in the grid.
Inventory – The combination of the warehouse and part number of either the manufactured item in the top row, or component or sub-assembly item in other rows, indented for easier identification. The warehouse portion is where the manufactured item will be ‘Built’ into, or where the component item will be consumed from. Manufactured and Component warehouses do not have to be the same. This value will display in two separate columns on the Template list, as Warehouse and Part Number, for only the Manufactured item.
Description – The description of the component, which defaults from the inventory record but can be changed.
Quantity – For the manufactured item, the quantity to build. For component items, the quantity to consume in production. This value will display in the Template list, with a title of Required Qty, for only the Manufactured item.
Extended Qty – For the manufactured item, this will be equal to the Quantity value unless there is a yield less than 100% from component usage. For component and subassembly items, this will be the value of the manufactured quantity times the component quantity. For subassembly components, this will be the value of the subassembly extended quantity times the sub-component quantity.
Unit Cost – For the assembly item being produced, the sum of the components extended costs, divided by the total quantity being build, and is for display only. For the components and sub-assembly items that follow, values are determined by a Company Setting for the Cost Method, which could be the Inventory cost, Current cost or Standard cost. Values can also be edited on component lines.
Extended Cost – The calculated total cost for this item on the production order. For component items, this is: (Extended Quantity) x (Unit Cost). For the assembled item or sub-assemblies, this is the total of all the component Extended costs.
UOM – The unit of measure associated with either the manufactured, component and sub-assembly items. This can be edited if alternate units of measure exist for any item.
Conv. Factor – The multiplication factor assigned to the unit of measure of each respective item is displayed.
Inv. Usage – The quantity of the component item being consumed, expressed in the item stocking unit of measure. It is calculated from the Extended Quantity times the unit Conversion Factor. This is not used for the manufactured item.
Lead – The lead time from the supplier, saved as an integer value. This value can be edited in the grid.
Vendor No – The vendor the component is usually purchased from. If this value is blank, Requisitions for the component item will use the Primary Vendor assigned on the inventory record. This is not used for the manufactured item.
Category – An optional field to classify any of the manufactured or component items, selected from a user-defined list of Bill of Materials Categories. Typically this is used for reporting purposes.
Exp. Yield% – The typical percentage of the manufactured item that is built using the component quantity values. A complete build would have a yield of 100%, and this value can be edited in the grid. If this value is less than 100%, then Extended Qty values for all items are increased it indicate that more components are needed to build the required qty of the manufactured item, calculated by dividing the Quantity by the Yield%. This value is not editable on component item lines.
Exp. Scrap% – The typical waste percentage for this component, which can be read from the template, and can also be modified manually. This is used to calculate the Expected Scrap Quantity.
Exp. Scrap Qty – The typical waste quantity for this component, which can be read from the template and can also be modified manually. This value is added to the Extended Qty used for the component item when building (unless an Actual Scrap Qty exists), which affects the cost of manufacturing and the quantity of this component consumed.
Employee – The employee code can be added manually to indicate who was responsible, if Payroll is integrated.
Employee Name – The name from the employee record as selected above.
Revision – For the manufactured item being produced, the revision value of the template, which can be set on the template when a change is saved.
Build Phase – For components or subassemblies that will be consumed prior to building the production order, assign the Phase code when this will occur. At the same time, the default WIP account specified in Company Settings will be included. The can be edited on the Production Order if required.
WIP Account – For components or subassemblies that will be consumed prior to building the production order, assign the Ledger clearing account that will be debited for the Work in Process transaction. WIP accounts to not have to be be same for all components.
Weight – For components, the unit weight from the production template. Newly added components use the unit Weight from the inventory record. The manufactured item has a unit Weight calculated from the components. All values can be modified if necessary.
Extended Weight – A display-only calculation of the unit weight multiplied by the Extended Qty.
Production Order Notes – Text related to the template as a whole, with the text box in a coloured background.
Instructions – Text related to the specific item highlighted in the grid, either a manufactured or component item.
At the bottom is a section that lists quantities for a selected item. This section is reserved for Production Orders and are not used for Templates.
Reports
Either from the Templates list screen or when editing a specific Template, you can print the Production Template report.

Production Template – Prints the list of component items and their respective quantities and costs, required to build the specified quantity of the Manufactured inventory item.
