
This is where items are added, edited and received on a PO.

Add / Insert – Create a new line for adding a new item, with the new line inserted immediately above the highlighted line in the grid. If you do not select an item code, you can do this to insert a blank line that can be visually helpful for organizing entry or printing on report forms. You can also add new items at the end of the list either by clicking in the cell under the last part number, or by pressing the Enter key when the last item row is highlighted.
Delete – Deletes the highlighted line. Only one row can be deleted at a time.
Serial Numbers – When an item that supports serial numbers or lot numbers is highlighted, this button will be active for use. Serial or lot numbers must be assigned for every quantity received. Click this button to enter the required serial or lot numbers.
Scan Items – Activate scanning item barcodes for adding new items to an open PO, or receiving items to an issued PO. When this screen is open, scan an item and it will be added to or received on the PO with quantity 1, and the dialog will remain open to continue scanning. Scan again to increment the quantity by one. If you first type a quantity value and the multiplier character in Company Settings (usually *), scanning adds the item with that quantity to the PO. You can also directly scan a serial or lot number and the item with that number is added to or received on the PO.
Comment – Add or insert text to the detail section of the PO, either for vendor instructions or when more text is needed than fits in the memo column. Click to open a window for entering as much text as you want. If you have information that you regularly include as comments, select a pre-defined record that has this text to include, for either sales or purchase orders. You can also create new comment records from here.
Show UDF – Include User Defined Field information for PO details, where each line of the purchase order can have unique information. The UDF structure can also be edited from here if user security settings allow this.
Receiving – You have the choice to receive All quantity remaining on this PO, calculated for each item from the Order Qty less the received To Date Qty, or receive None and clear the Received Qty value from all items.
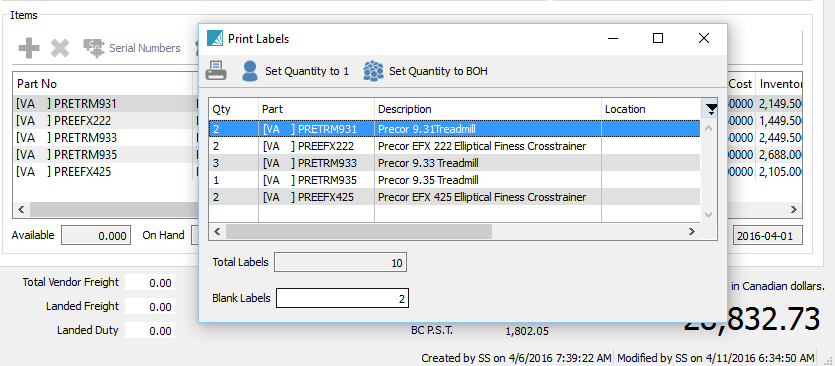
Labels – Opens the Print Labels screen to select quantities of labels to print for each item. Print count values could default from the Received, To Date or Order Qty of each item, which can be modified before printing. Read the Inventory Labels manual topic for more information.
Open Inventory – Opens the inventory item for viewing or editing item information.
Open Source – When an item on a PO originating from a Sales Order requisition is highlighted, this button will be active for use. The Sales Order transaction for this item will be opened in a new window.
Detail Lines Info
The PO details grid has many field columns to display, and most of them are editable for ordered items. Some columns may not be visible to users that do not have the security permissions to see them, and other columns require user security access to edit.
Part No – The item number entered or selected from inventory. You may be able to enter a miscellaneous non-inventory item value if user security settings are allowed.
Description – The description of the part number from the inventory item record, which can be edited if user security allows. For non-inventory items, you should enter a description value.
Min Qty – The minimum order quantity defined on this item, either on the Inventory Details tab or from the Vendor Prices record. This may affect the default Order Qty value when adding this item to a PO.
Order Qty – The quantity of the item desired to be purchased. By default this will be the higher of the minimum order quantity from the item, or calculated from the quantity available of the item and any backordered sales orders or issued purchase orders.
To Date Qty – The quantity that has previously been received for this line of the PO, which may be either the full or partial quantity ordered.
Receive Qty – Quantity being received now, which will be added to inventory when the Receive toolbar button is clicked.
Cost – Cost of the item in the unit of measure selected on the purchase order detail. This defaults from the item Current Cost but can be edited.
Inventory Cost – Cost of the item in the inventory item stocking unit of measure.
UOM – The purchase Unit of Measure, which defaults from the item Purchase UOM when added to a PO, but if any other units are defined on the item that are configured to be allowed as a purchase unit, then they can be selected here. The Cost column is recalculated based on the UOM conversion factor of the new unit, and the Weight from the UOM is used.
Tax 1-4 – These tax flag columns display based on the tax codes selected on the Sales Taxes tab. These checkboxes are editable if user security allows, and if so these can be disabled if this item is tax exempt for this vendor.
Extended Cost – The total discounted cost for this item, calculated from the Order Qty and the PO unit Cost.
Duty % – The default value comes from the Inventory item Details tab, but you can change this value as required. The Duty amount is calculated from this percentage and the item Extended Cost. If you edit the Duty amount directly, this percentage will be recalculated. If the Company Setting for Inventory to Save Landed Costs is enabled, then the Duty % on the Inventory item will be updated to the value from the PO detail.
Duty – Duty accrued for this line of the purchase order, calculated from the Duty % and the Extended Cost, but you can change this value as required. This amount will increment the Landed Duty value in the PO Footer. Posting the receipt will update the Current Cost of the Inventory Item, calculated from the PO Extended Cost with duty included, and the GL transaction will have a credit amount posted to the Accrued Duty account defined in Company Settings.
Freight % – The default value comes from the Inventory item Details tab, but you can change this value as required. The Freight amount is calculated from this percentage and the item Extended Cost. If you edit the Freight amount directly, this percentage will be recalculated. If the Company Setting for Inventory to Save Landed Costs is enabled, then the Freight % on the Inventory item will be updated to the value from the PO detail.
Freight – Freight accrued for this line of the purchase order, calculated from the Freight % and the Extended Cost, but you can change this value as required. This amount will increment the Landed Freight value in the PO Footer – different than the Vendor Freight value, which will appear on the vendor invoice as a charge. Posting the receipt will update the Current Cost of the Inventory Item, calculated from the PO Extended Cost with freight included, and the GL transaction will have a credit amount posted to the Accrued Freight account defined in Company Settings.
Required Date – When you expects to receive this item from the vendor. The value defaults from the ‘Required Date’ in the Order Details, and if the Order Details date is changed, you will be prompted to update all Required Date values to the same value. By default this is not printed on the PO.
Vendor Part No – The vendors part number for this item. If a value existing on the PO detail, it will be used on the Spire default purchase order report instead of the inventory part number.
Inventory GL – The Inventory control GL account for this inventory item, based on the item Sales Department, which can be edited if user security allows.
Location – The warehouse location description for this item or Unit of Measure for reference, different than the Location in Order Details which affects accounting. This can be edited and the new value will update inventory.
Pack Size – A value representing how much quantity is in a package, perhaps related to a unit of measure or sales target. It appears on sales order detail lines, perhaps to encourage the salesperson to sell full packs, but it is informational only and does not affect purchase order functionality.
Discount % – An optional discount percentage applied to the Cost of this item. This is separate from the PO discount percent you can apply from the order footer section.
Sell Price 1 – The Level 1 unit price for this item. If you edit this value, when the PO receipt is posted, the inventory item unit price will be updated with this change.
Memo – A place to enter many lines of text, associated with this line of the order for notes or any other purpose. Memo text does not print on any reports or forms.
Reference – A text field to use in any way you need, such as to cross reference to another document like a supplier item warranty, where the suppliers invoice number is entered here. By default this field does not print on any reports or forms.
Source Type – If the PO detail was created by a processed Requisition, this field will be contain the requisition source, which can be any of Inventory, Sales Order or Production Order.
Source No – If the PO detail was created by a processed Requisition from a Sales Order or Production Order, that transaction number is displayed here.
Customer – If the PO detail was created by a processed Requisition from a Sales Order, the customer code from that sales order is displayed. This is very useful so that the person receiving this PO knows this item is reserved for this customer sales order, not for general stock.
Ship To – If the PO detail was created by a processed Requisition from a Sales Order, the Ship To ID from that sales order is displayed.
Employee – The employee code assigned to the line, perhaps for labour charges, commission or other tracking purposes
Employee Name – The name of this employee selected on this line.
Weight – The weight of an item multiplied or divided by its unit of measure conversion factor. You can override this value on a PO, but if the weight has changed then you should also update the weight on the inventory item as well.
Ext Weight – The total weight for this item, calculated from the Order Qty and the Unit Weight.
Job Account – The job and account that this line of the PO is assigned to, which by default comes from the value selected from the Job tab but can be edited for any line.