
When viewing the Accounts Payable for a specific vendor, a screen appears with vendor information and a list of open transactions.

Header
Open Vendor – Allows the user to open the vendor to see all information including purchase orders not yet closed.
Navigation – Navigates from vendor to vendor in the order that the list AP list was in.
Contact – Vendor contact determined from the Company Setup for the AP Contact Type.
Info – Shows credit and year to date purchases with the vendor.
Open Items
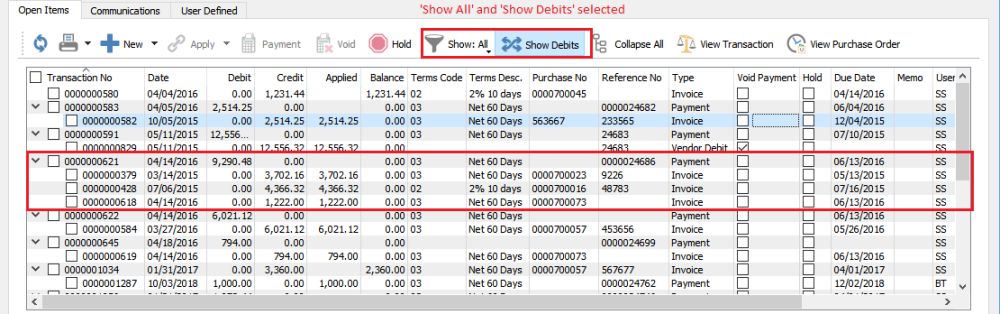
All Open transactions with a non-zero current balance are displayed by default. Any transactions with an arrowhead at the left have other applied transactions that can be viewed by clicking the arrowhead and expanding.
Transactions can be selected for some processes by clicking the checkbox next to them, where the same process can be done for multiple transactions at once. For other processes where it only makes sense to perform on a single transaction, they are selected by highlighting the row in the grid.
Refresh – Display any new entries other users have posted.
Print – Prints report with the template of ‘Accounts Payable’
Add – Create a new Accounts Payable transaction entry for this vendor. Available types are Invoice, Payment, Vendor Credit or Vendor Debit.
Apply – If unapplied payment(s) or vendor credit(s) exist, you can select these from the checkboxes, along with associated invoice(s) and apply them together. If the amounts equal they will both be removed from the Open Items list. If one is larger than the other, then the larger transaction will remain on the list with a reduced balance.
Payment – Pays all invoice(s) with the checkbox enabled. The Payment screen appears and allows you to change the date, bank account, print status or applied payment amount for each selected invoice.
Void – If an open invoice is selected from a checkbox, Void will create a reversing Vendor Credit transaction. If a payment applied to an invoice is selected, Void will unlink the payment from the paid invoices and instead apply a reversing Vendor Debit transaction. Invoices from purchase order receipts cannot be Voided. Voiding must be enabled as a user security setting.
Hold – Sets the Hold status on the highlighted invoice so it cannot be paid.
Show – Shows Open, All or ‘All since fiscal year’ entries, including fully paid invoices with applied payments or vendor credits.
Show Debits – Toggle this button to switch the display orientation and list payments or vendor credits in the grid, with all applied invoices when expanding. This is a useful display to investigate which invoice(s) were paid by a particular payment. Any invoices with no applied transactions will continue to display with Show Debits selected.
Expand All – Expands the links for all transactions to see all invoices and related payments, or all payments and related invoices if Show Debits is toggled on. This is for convenience if you want to see all applied transactions or are searching for a specific one.
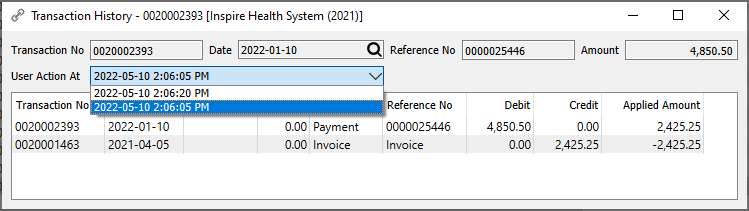
View History – Highlight a transaction and see it and all applied transactions in a separate window. The date and time of the User Action when the transactions were applied is also displayed, and in the case of multiple separate times when a transaction was applied, the User Action displays just those applied at that date and time.
View Transaction – Views the GL account activity of the highlighted transaction when it was posted.
View Purchase Order – Views the purchase order for the highlighted transaction. If the PO is not closed it will be opened from the purchase order list and can be processed or edited in this screen. If the PO is closed then it will be viewed from PO history and therefore will not be editable, but could be credited or copied.
Communications
Notes – Any number of notes can be added to the vendor accounts payable, which are separate from the communications stored on the vendor record with each address.
Attachments – Any number of attachments can be added to a communication note. From the Communications list, clicking the Open Attachment button will open the first attachment in the default viewer for that type of document. If the note is edited, any attachment can be opened by clicking the file or URL name.
Read the Communications manual topic
User Defined
User Defined – User defined fields can be added to track and/or print. (Spire UDF license required).