
The Purchase Order Header contains a number of toolbar buttons that control status maintenance and perform functions on the purchase order as a whole.
The toolbars at the top are displayed regardless of which purchase order tab is open.
Open Vendor – Opens the vendor for viewing or editing vendor information.
Open Currency – When the vendor on this order has a billing currency other than the base currency, this button is active and the currency code is opened for viewing or editing information, such as the exchange rate.
View Compact – When the Main tab is open, this function suppresses most of the vendor, general and order detail fields so that the item grid can be expanded to display more details at a time. When the view is compacted, the button becomes View Expanded to restore the screen to it’s original display.
Refresh Prices – Updates the unit Cost and Price values for all Inventory items on the PO.
Issue – Sets the Issued status to the purchase order, typically for the purpose of sending a PO for to the vendor. Issued POs have limitations in what fields are available to edit, and the Receive Qty column becomes available in the PO Details grid to enter values when the goods are received. Use this status if you expect to partially receive a PO.
Receive – Sets the Received status to the purchase order, and all items with non-zero Received Qty values will have Quantity on Hand and Costs updated. If the PO has the Open status and was never Issued, the entire PO will be fully received as ordered, with no opportunity to edit item received quantities. You also have the opportunity to enter the vendor invoice at this time if it came with the receipt, and therefore set the PO status as Invoiced after posting, or you can save the PO and enter the vendor invoice later.
Unissue – When editing an Issued or Received PO, you can choose to set the status back to Open, in order to add new items or make any other changes not possible to do on non-Open POs.
Invoice – Create a vendor invoice on a Received PO not yet invoiced and post it to the vendor. An invoice screen appears to post the invoice to the vendor account, and corrections to invoice or tax or freight amounts can be made, in addition to entering the vendor invoice information.
Invoice – Post and Review GL – In addition to the above, when invoice posting is complete, you can modify amounts and accounts on the GL entry if user security settings allows it, except the accounts receivable control.

Close – Completes the purchase order from any further processing and removes it from the PO list.
Next Phase – If the PO has a non-blank Phase value, you can increment the phase to the next one in the user-specified sequence, if you have user security rights to do so.
Totals By Ordered Qty – When this button is toggled on, the transaction total amount in the bottom-right corner of the order screen is calculated from the sum of item Extended Prices based on the Order Qty. When this button is toggled off, the transaction total amount is calculated from the item Received Qty. The difference in the total amount comes from items on backorder.
Add To Calendar – Creates a new Communication note for this PO, and assigned to the entry user with a due date of today by default. When the note is saved, it will create a calendar entry for the specified user and due date. Read the Communications or Calendar manual topics for more information.
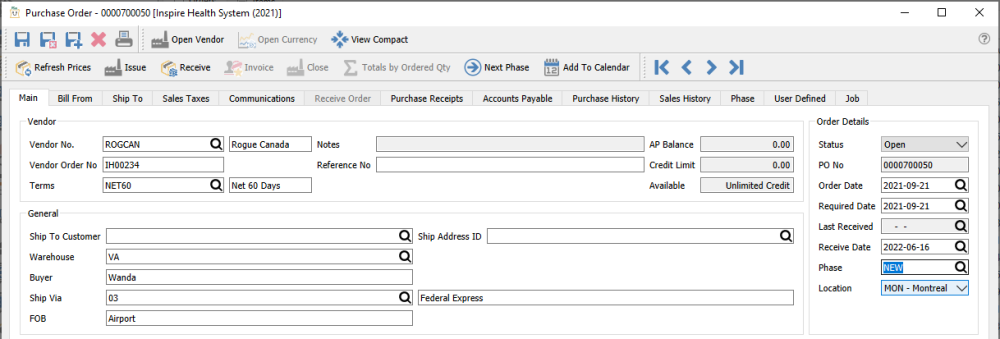
Main
Vendor – Enter the vendor code for the purchase, and the name is displayed to the right. You can also enter search criteria to locate the vendor based on that search results. For example, type the city and vendors within that city will be presented in the drop down list. If more vendors meet the search criteria than are displayed, press the ‘F9’ key to open a window with the complete list of vendors that match criteria, from which you can select. You can also use a combination of words to search such as the contact name and the city and the list presented will be restricted to the results that contain both words.
Vendor Order Number – A confirmation number given by the vendor for this PO.
Terms – Payment terms that determine the invoice due date and if an early payment discount can be taken. It defaults from the vendor payment terms but can be changed on the PO.
Notes – This field has information from the Notes field on the General tab when editing a vendor. Information in this field is displayed with a yellow background to stand out.
Reference No – A text field you can use for any purpose, such as for an external document number.
AP Balance – The vendor current balance owing.
Credit Limit – Vendor credit limit, either 0.00, a specific amount, or Unlimited.
Available – Displays either Unlimited credit, Limited credit or No credit. No calculated amount is shown here.
Order Details
Status – The status of the PO can be:
- Open – A new PO that allows adding items and editing other information, and has not usually been sent to the vendor yet.
- Hold – Open POs can be put On Hold, to prevent editing some information and also to prevent issuing, receiving or invoicing the PO.
- Standing – A recurring purchase from a vendor, that will be maintained in the PO list after it has been received and invoiced.
- Issued – Usually means that the vendor has received a copy of the purchase order. Issued POs have limitations in what fields are available to edit, and the Receive Qty column becomes available in the PO Details grid to enter values when the goods are received. With the correct security permissions the user can un-issue and then edit the PO. Care should be taken to make sure the vendor has the correct copy of the PO.
- Received – Means that this PO has had some or all product received on it. Received POs have limitations in what fields are available to edit; even if the PO is unissued, lines that have had receipts still cannot be changed.
PO No – An automatically assigned document number from Company Settings, that can be changed if you have another Company Setting enabled.
Order date – The date that the order was taken and first saved, which defaults to today but can be changed to any date. A warning message will appear if you choose a date older than today.
Required Date – The date that you want the goods delivered by. The value defaults to today but can be changed to any date, and if edited then a prompt appears to update the required date for all items entered on the order. Required Dates are useful as you can sort by this date column on the purchase order list grid to see how soon expected goods will arrive.
Last Received – If any items on this PO have been received, the date of the most recent receipt is displayed here.
Receive Date – The date that will be used for the next receipt transaction. This defaults to today, and you can edit the value prior to receiving the PO
Phase – Select from the list of company-specific statuses, perhaps to indicate the progress of the order before it is issued. If a report template is included with the selected phase, any report that has that template name will be presented for printing. You can ‘increment’ the phase value to the next one in the purchase order phase sequence if one is assigned by using the Next Phase button in the toolbar, which useful when orders must go through a particular sequence of procedures in turn.
Location – If you have Locations enabled in Company Settings, and any of the Cost or Accounts Payable control accounts are configured with a Location segment, the posted GL transaction will update the accounts with the respective location segment.
General
Ship To Customer – If the PO will be drop-shipped directly to the customer, enter the customer code here to affect the Ship To address of the PO.
Ship Address ID – If the PO will be drop-shipped directly to the customer, enter the customer shipping ID here to affect the Ship To address of the PO.
Warehouse – The default warehouse code from where items are selected from the details grid in entry. It defaults from the Warehouse selected on sign-on but can be changed on the order, which does not affect existing items but only newly added items. The warehouse address and contact information is loaded into the Ship To tab if a customer drop-ship is not used.
Buyer – The person that placed the order with the vendor. This value defaults from the vendor Buyer value on the General tab when the vendor is selected, but it can be changed.
Ship Via – The code for the shipping carrier used for sending the goods to the customer. It defaults from the vendor Order Defaults tab for the address but can be changed on the order. When selected, the name will be loaded from the Shipping Method record. If this carrier does not have a Ship via code, you can still enter the name manually.
FOB – Free On Board is a term in international commercial law specifying at what point the seller transfers ownership of the goods to the buyer. Sometimes this field is used for other data desired for the order, as FOB information isn’t required.
Bill From
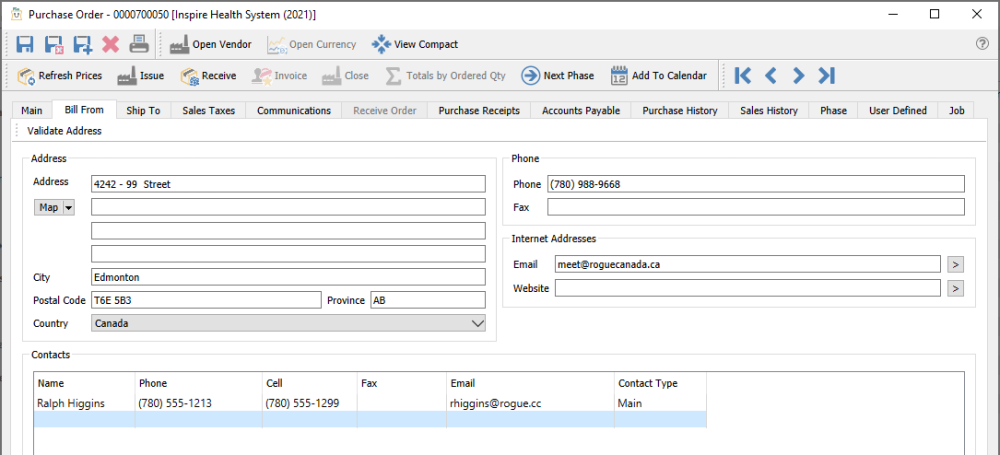
This is the vendor billing information for this PO. It includes vendor contacts and email addresses that will be available for emailing the purchase order to the vendor. The addresses can be edited but will not get updated to the vendor record. If the vendor record is edited the purchase orders that already exist will not be updated.
Ship To
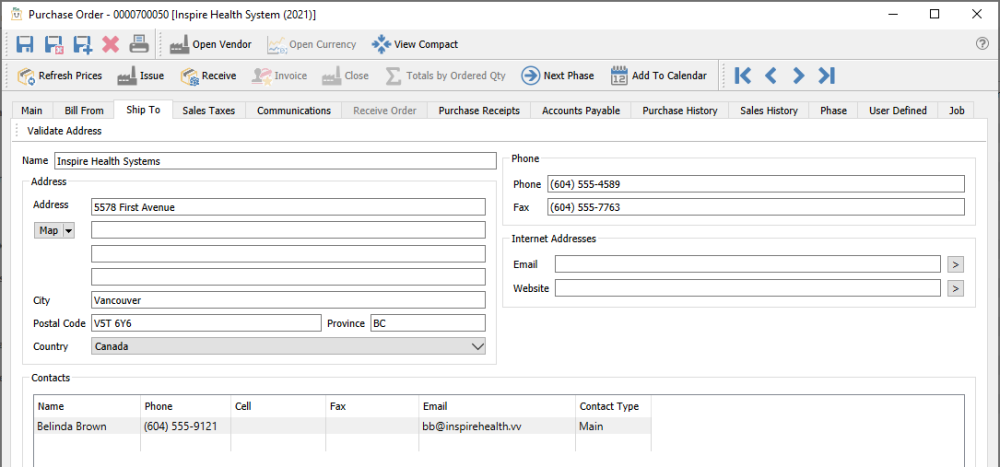
This is the address and contact information for where the purchased goods will be shipped. It includes the email addresses that will be available for emailing the purchase order to the vendor. This typically will be the warehouse address unless it is being drop-shipped directly to a customer.
Sales Taxes

The purchase tax jurisdictions for this PO, which default from the vendor but can be edited.
Communications

Any number of communications can be added to a PO. They can be set as alerts so that they popup when the PO is edited. The example above shows a popup to let the vendor know about a new warehouse address.
Any number of links or attachments can be added to a communication. When double clicked it will open the URL or attachment with the default viewer for that type of document.
For more details on Communications. Link to the Communications
Receive Order
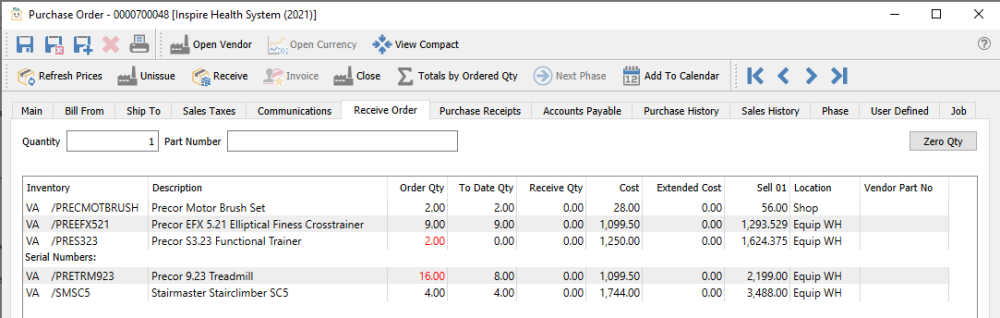
From this tab, you can scan in the items as they are being received. To initialize the receive quantities, click the Zero Qty button, setting them all to zero and displaying the order quantities in red font colour. Then scan the item barcode to increment the Receive Qty of any existing item by the value in the Quantity field. You will not be able to scan a new item that is not already on the order, nor scan it item to result in a Receive Qty greater than the Order Qty – an alert sound will occur with the error message in both cases.
When an item scan has been done to make the Receive Qty equal to the Order Qty, the font colour will become blank instead of red, indicating that this line is complete.
Purchase Receipts
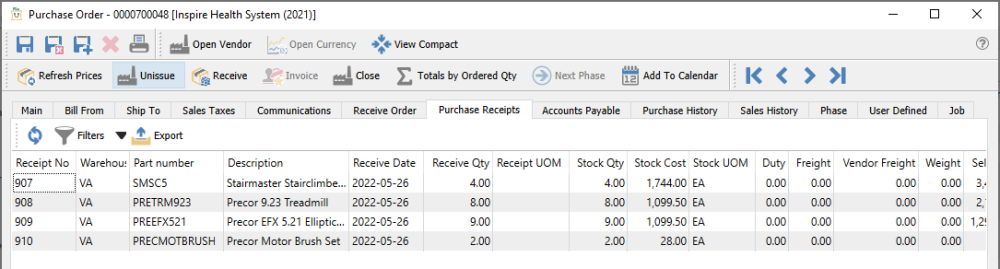
This screen shows each item in this PO that has had quantity received, with the receipt number and date. If an item was received on multiple partial receipts, each receipt is displayed separately. Each item also includes the landed costs in addition to the stock costs.
Accounts Payable
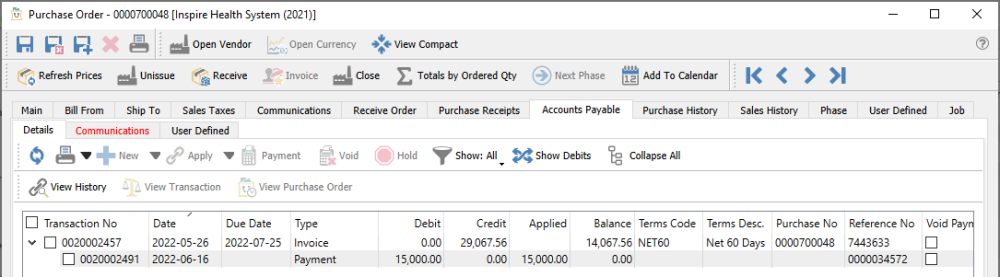
This tab shows all AP entries that have been made for this PO, including invoices and payments. You can use all the features of the Accounts Payable module here, if user security allows displaying this tab or options set, but limited only to the transactions displayed for this PO. This includes issuing a payment and printing the check.
Purchase History
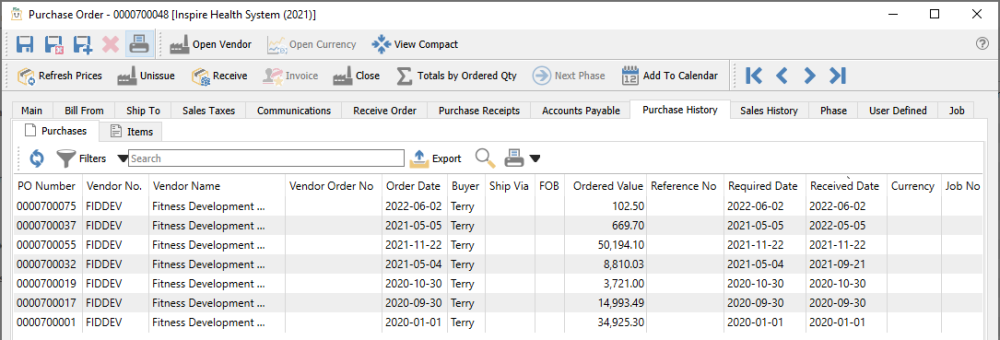
This tab allows you to see all historical purchase receipts for this vendor, completed and closed to history. There are two sub-tabs, one for the list of invoices and the other for the list of items from those invoices. On either sub-tab you can search for, filter or export records of interest, and double-click a row to open the Purchase History receipt in a new window.
Purchases – Purchases tab represents the individual Purchase Orders from the Vendor’s Purchase History
Items – Items tab represents the individual Part No. items of the Purchase Orders from the Vendor’s Purchase History
Sales History

This tab lists all of the sales history for just the items on this PO. This is useful to see how well these items are selling, when deciding how many to purchase.
Phase
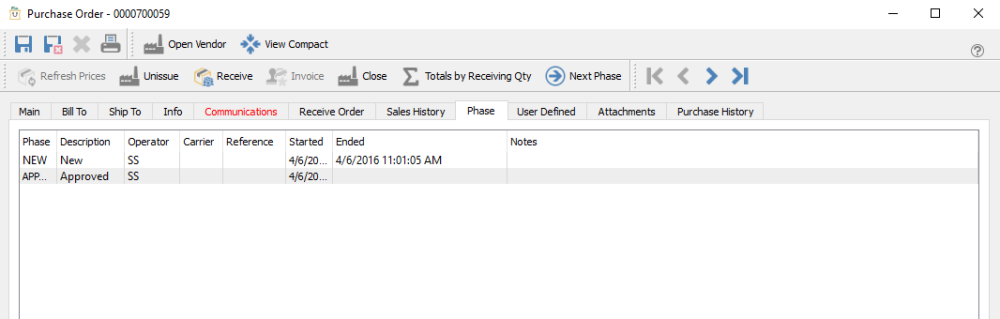
From this tab, you can see what phases a purchase order has been in, and when each new phase was started. The dates and times are editable in case corrections are necessary, and you can also add shipping carrier info, reference numbers and notes to describe anything important about this phase of this PO.
User Defined
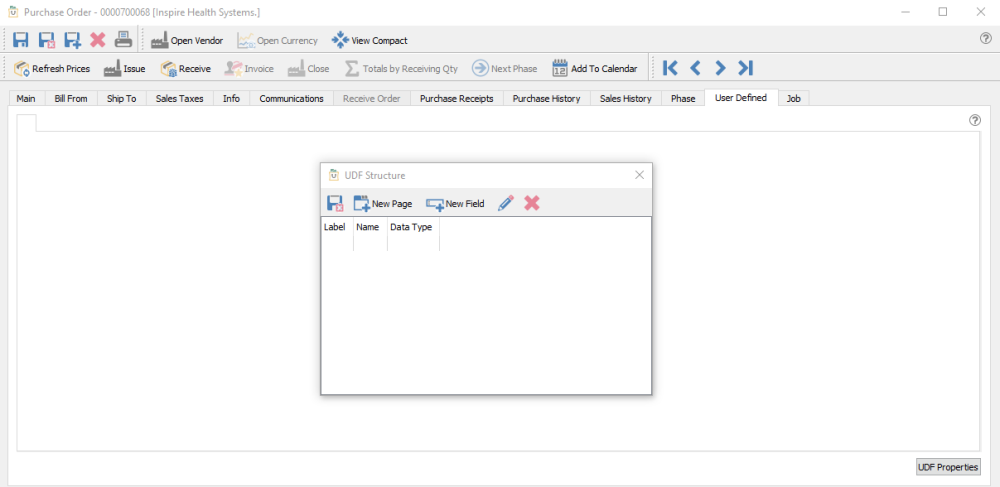
User Defined fields allows you to add any number of extra fields to a purchase order that pertain to your POs for your business. To be able to edit the design of the UDF (User Defined Fields), you need to have the correct security access. Read the User Defined Fields manual topic for more information.
Job
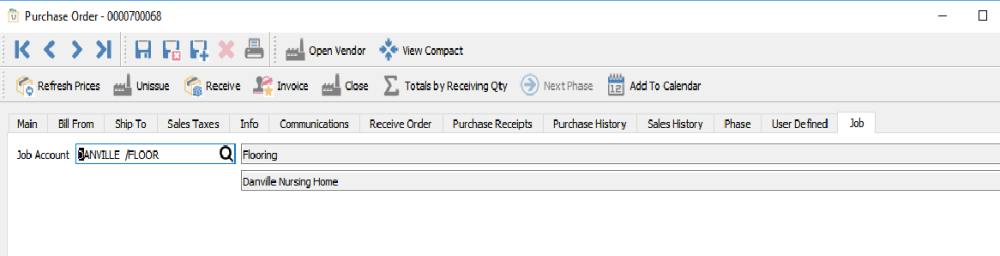
If you want to track jobs and accounts for purchases, you can select values here, which automatically get added to all details on the PO.